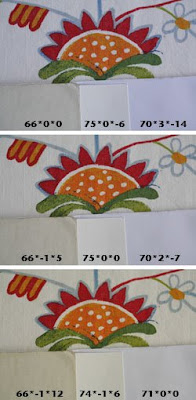
Custom white balance (CWB) setting for correct gray balance in the camera is a very powerful tool when being used correctly.
The problem is that white isn't always white when it comes to spectrophotometric definition. "Point the camera at a white surface and set CWB" just isn't enough for a photographer who wants to get it right. The problem is illustrated in the picture below.
There are three different white surfaces in the picture. From left to right: An old slightly yellowish backside of a Kodak 18% gray card. The white patch on QPcard 101. An envelope from the mail.
The camera always assumes the surface it is being pointed at when setting CWB is neutral. By pointing the camera at the left "white" surface, the whole picture becomes bluish. Many white papers are bluish, like the envelope to the right, which gives a warm tint to the picture.
In order to set CWB correctly it is necessary to point the camera at a perfectly neutral surface, like QPcard 101.
The numbers in the picture are L*a*b values measured in Adobe Photoshop. "L" is lightness, "a" is red or green, "b" is yellow or blue. 0 (zero) for a and b means neutral, with no tint of any color.
Gray balancing QPcard 101
Autor:
Kulinarny poszukiwacz
o
07:09
Etykiety:
Camera,
Gray balancing,
Photography,
Professional,
QPcard
Instruction for gray balancing with QPcard 101 using the Eyedropper tool in Adobe Photoshop.
1) Place QPcard 101 in the subject. Make sure it is lit by the same light as the main part of the subject.
2) Take a picture with white balance on camera on an appropiate setting (NOT Auto White Balance!).
3) Take the rest of the pictures without QPcard 101.
4) Open the first picture in Adobe Photoshop or other suitable image or camera software.
5) Choose the eyedropper tool and set Sample Size to 5 by 5 Average.
6) Check the gray balance in the gray patch of QPcard 101. In this example it is too blue and a little bit too green.
7) Choose Levels and click on the gray eyedropper. Make shure it isset to neutral by double clicking and checking RGB numbers. Default setting is 128, 128, 128.
8) Now click on the gray patch of QPcard 101. The RGB values will become equal, meaning neutral gray. If the gray patch still seems to have a color cast you have to calibrate your monitor.
9) Save the gray balancing profile by clicking "Save...".
10) Open the other pictures taken in the same light and same white balance setting on camera.
11) Choose Levels and click "Load..." to apply the saved gray balancing profile.
QPcard 201 is a reference card with 27 different colors.
It is designed to be used with the software QPcolorsoft 501 that can be downloaded free on this site. The colors on the card are mixed separately from pigments and extremely fade resistant. Some of the colors are mixed to resemble the spectral response of colors in real life: Light skin (#18), Dark skin (#17), Sky blue (#25) and Forrest (#15). The seven neutral patches (#4?10) all have an almost straight spectral response. In practice this means the QPcard 201 can be used in almost any light condition with almost any camera, without suffering from metamerism.
The card is self-adhesive making it perfect to place on almost any surface in the subject. The size of the card is 142 x 40 mm (5.6 x 1.6 inch).
Subskrybuj:
Posty (Atom)