piątek, 21 listopada 2008

Custom white balance setting

Custom white balance (CWB) setting for correct gray balance in the camera is a very powerful tool when being used correctly.

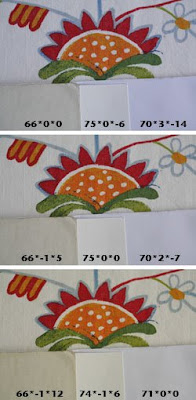
The problem is that white isn't always white when it comes to spectrophotometric definition. "Point the camera at a white surface and set CWB" just isn't enough for a photographer who wants to get it right. The problem is illustrated in the picture below.

There are three different white surfaces in the picture. From left to right: An old slightly yellowish backside of a Kodak 18% gray card. The white patch on QPcard 101. An envelope from the mail.

The camera always assumes the surface it is being pointed at when setting CWB is neutral. By pointing the camera at the left "white" surface, the whole picture becomes bluish. Many white papers are bluish, like the envelope to the right, which gives a warm tint to the picture.

In order to set CWB correctly it is necessary to point the camera at a perfectly neutral surface, like QPcard 101.

The numbers in the picture are L*a*b values measured in Adobe Photoshop. "L" is lightness, "a" is red or green, "b" is yellow or blue. 0 (zero) for a and b means neutral, with no tint of any color.

Gray balancing QPcard 101

Instruction for gray balancing with QPcard 101 using the Eyedropper tool in Adobe Photoshop.

1) Place QPcard 101 in the subject. Make sure it is lit by the same light as the main part of the subject.

2) Take a picture with white balance on camera on an appropiate setting (NOT Auto White Balance!).

3) Take the rest of the pictures without QPcard 101.

4) Open the first picture in Adobe Photoshop or other suitable image or camera software.

5) Choose the eyedropper tool and set Sample Size to 5 by 5 Average.


6) Check the gray balance in the gray patch of QPcard 101. In this example it is too blue and a little bit too green.

7) Choose Levels and click on the gray eyedropper. Make shure it isset to neutral by double clicking and checking RGB numbers. Default setting is 128, 128, 128.


8) Now click on the gray patch of QPcard 101. The RGB values will become equal, meaning neutral gray. If the gray patch still seems to have a color cast you have to calibrate your monitor.

9) Save the gray balancing profile by clicking "Save...".

10) Open the other pictures taken in the same light and same white balance setting on camera.

11) Choose Levels and click "Load..." to apply the saved gray balancing profile.

QPcard 201 x 2

QPcard 201 is a reference card with 27 different colors.

It is designed to be used with the software QPcolorsoft 501 that can be downloaded free on this site. The colors on the card are mixed separately from pigments and extremely fade resistant. Some of the colors are mixed to resemble the spectral response of colors in real life: Light skin (#18), Dark skin (#17), Sky blue (#25) and Forrest (#15). The seven neutral patches (#4?10) all have an almost straight spectral response. In practice this means the QPcard 201 can be used in almost any light condition with almost any camera, without suffering from metamerism.

The card is self-adhesive making it perfect to place on almost any surface in the subject. The size of the card is 142 x 40 mm (5.6 x 1.6 inch).

QPcard RAW package

Calibrate your digital camera for RAW shooting using QPcard 201, Adobe Photoshop and Adobe Camera RAW (ACR).

In ACR there is a tab called "Calibrate". Here you will find sliders for adjustment of Shadow Tint, Red, Green and Blue Hue and Saturation. Using these sliders you can finetune the color reproduction of Adobe Camera RAW converter. However, it is almost impossible to succeed without a reference color target like the QPcard 201.

Finetuning of RAW can be achieved manually or automatically. The manual procedure is described by Bruce Fraser here http://www.creativepro.com/story/feature/21351-1.html

In order to accomplish this with QPcard 201 you need a reference image with RGB values. This image can be downloaded here.

But there is also an automatic way to go. Rags Gardner at http://www.rags-int-inc.com has a Technology department on his site: http://www.rags-int-inc.com/PhotoTechStuff/ with lots of useful information and solutions for digital photographers. Rags has written a Javascript for automatic color calibration with ACR. The script can be downloaded free from Rags site here:
http://www.rags-int-inc.com/PhotoTechStuff/ColorCalibration/

You can read Rags explanation here:
http://www.rags-int-inc.com/PhotoTechStuff/AcrCalibration/

QPcard 101 v2 x 3

QPcard 101 is a reference card targeted for professional photographers

Qpcard 101 v2 is the new improved version of Qpcard 101. It has three patches with perfectly neutral dark gray, mid gray and white colors. The Cie L*a*b values are 35*0*0, 48*0*0 and 95*0*0. The spectral respons of the three colors is almost perfect straight, meaning there will be no problems with metamerism at all. The colors are extremely fade resistant. The main purpose with the card is to use the gray patch for neutral gray balancing of the image. The gray patch is reflecting 18 % of the light, making it useful also for exposure purposes. Since the white patch is free from fluorescent whitening agents, it is perfect for custom white balance setting of your camera before shooting. There is a millimeter reference scale on the card.

The card is self-adhesive making it perfect to place on almost any surface in the subject. The size of the card is 142 x 40 mm.
czwartek, 23 października 2008

The versions: Capture One 4, PRO and DB


Here is a quick explanation to clarify the naming and versions of Capture One 4. 4 indicates the software generation. The previous generation was 3. Included in the software is Capture One 4 DB (for digital backs only), Capture One 4 PRO (for digital backs and DSLRs), and Capture One 4 (for digital backs and DSLRs but without PRO features like Tethered Shooting and Styles). How you activate the software defines which version you are running. To confirm which version is activated, select License from the Capture One drop-down menu and the information screen appears. We have had a number of releases in the Capture One 4 series. Our current release is Capture One 4.5.
Support for Capture One 4 PRO

The Phase One support team have been very busy to make sure that resources are available for Capture One 4 PRO users. Select the Latest 10 articles in the Knowledge Base to see some of the new materials. As well, download the Capture One 4 User Guide (all versions).

Additional resources to consider from support includes the User Forum. If you are not a member of our forum, register and enjoy sharing ideas and comments.
Capture One 4 PRO software is now available for download! This is a landmark software release for Phase One and we are introducing many new changes.

Our R&D team have worked hard to develop a software architecture that can be quickly updated for new DSLR support and new features or functions. This new architecture is an engineering marvel that will allow us to keep up to rapid OS changes for both Mac and PC. I am also proud to note that both Mac and PC versions now look and operate in a similar manner.

The most important aspect of Capture One 4 PRO is that the functionality and workflow of version 3 is retained with all of the enhanced quality advantages of Capture One 4 PRO! The ColorEditor is now integrated, Styles are enhanced, and new creative tools have been added. Our breakthrough Lens tools prove that world class optical correction can be applied to almost any lens with spectacular results, regardless of camera platform.

If you have not had a chance to see Capture One 4 PRO in action, download a free 30 day trial and enjoy some new creative freedom!

We have a great story on the image for the new Capture One 4 PRO box by Tim Griffith. The architectural work of Tim Griffith is so focussed upon capture and with our own focus upon capture it seemed like the perfect opportunity to work with a creative icon. Look for the whole story on Tim's shoot in the next issue of RAWNEWS+.
środa, 24 września 2008

+ Sensor + provides flexibility, choice to photographers

Sensor+ represents some very unusual technology that is completely different from anything we have ever offered before or has ever been offered in our industry.


We now provide two solution families with the P 65+ as our only back in the Sensor+ family and the rest of our backs as part of the XPose+ family of solutions. Learn more about Sensor+ technology and what our two solution families offer by reading the Phase One
Photokina is a great time for us to meet and talk to thousands of photographers over the 6 days of the show. We have a lot to talk about. The P 65+ is here! Finally, we have real full frame capture with 60.5 megapixels of resolution. Phase One is also rolling out our Sensor+ technology with the P 65+ which offers a scaled 15 megapixel output at full frame and double the ISO!


Just as exciting is our first public showing of Capture One 4 PRO. We are very near to releasing our final public version. I am extremely proud that our development team has retained the ability of Capture One to control and balance how digital or analogue an image can look and feel. Capture One 4 PRO actually goes much further with many new tools that push this control in new creative directions. Our expected release date is October 15th and we look forward to your excitement for the many new features and functions.

This month our feature article is a first shoot experience with photographer Drew Gardner and the P 65+ with Capture One 4 PRO. We also announce details about the P 65+ and Sensor+, Capture One PRO 4, our new expanded Phase One digital lens range and finally our newest alliance with Leica.

For many of you who will be at Photokina, we look forward to seeing you!
Peter Eastway is rewriting the rules for highend travel photography. Using the Phase One P 45+, Peter achieves results that rival 4x5 film qualty while still having the versatility to shoot hand held. This article is a practical explanation of how images are created on location and what it takes to get the shot.


The extensive experience and knowledge that Peter has, shows through in his real world scenarios. Read the PDF here.

Capturing a better world

Solving some of the most pressing problems on a world scale needs a different way of thinking about each other and how we all fit. MYC4 is a micro banking group focused on Africa providing loans to those who would otherwise never get a chance. Jens Honoré was commissioned to document some of the incredible results for an exhibit to further publicize the MYC4 project.


Jens approached this project in a completely different way with surprising results. Read about why Jens chose medium format over a DSLR and see more of his results. This is a powerful discussion of how equipment changes the look of an image. Read the PDF article here.
Compact lighting tools, enormous exposure latitude with our Phase One P+ backs, powerful laptops, accurate LCD monitors and portable generators have transformed shooting locations into full production studios. The Phase One 645 Camera platform has been designed with the growth of location work in mind. With our product announcements before and at Photokina, we will add to the travel and on-location photographer's arsenal of tools!


This month we feature an article about rethinking the location kit by Peter Eastway, a review of the Phase One 645, P 45+ camera solution from Digital Photographer magazine and an article featuring Jens Honoré and his location work in Africa with micro banking group MYC4.

More and more in our industry are starting to understand that the point of photography is the subject, not the equipment, software or post-production. For Phase One, focusing on capture has been a key to our success. Our tools are designed to enhance a photographer’s workflow so that the moment and look of an image stays as unique as possible.


Henrik Håkonsson, President and CEO, Phase One
wtorek, 9 września 2008

Michael Furman - New perspectives

The photography of Michael Furman of Philadelphia, USA explores the influence of society on car design. The body of work reflects a very strong interaction between photographer, perspective, lighting, subject and the intent of the car's designer.


Michael takes crafstmanship capture very seriously sharing ideas and the philosophy that makes his work so successful. Read the PDF article here.

John DK - An evolution of art and business

Based in Barcelona, Spain, John DK makes working with the team a key part of how projects come together. John blends intuition about locations and a remarkable technique of capturing a car from before sunrise until after sunset for some incredibly original results.


This article also breaks the code of silence and give up some of the secrets to shooting cars. Read the PDF article here.

Chris Lewis - No compromise shooting


Auckland, New Zealand is the home base for car photographer Chris Lewis. Running a successful equipment rental business makes it much easier to invest in the best possible tools like his motion rig that is partially made of glass. Creating images that require minimal post-production is a passion with Chris that keeps bringing clients back for more. Read the PDF article here.

The Quick Tab - swift image making

Capture One 4 allows you to edit your RAW files in various ways. The Quick Tab is a selection of the most commonly used tools, topped with the base characteristics, the ICC profiles and curve presets.

You find different camera settings in the ICC drop-down menu, Capture One 4 supports around 90 different camera models now and more will come.


Select cameraprofile adequate for the image, or choose between the camera recording presets, such as flash, tungsten, daylight etc. these presets will provide the possibility of deciding the tone of light after recording the image, from standard values.

In the same drop-down menu you find the effectfilters, providing effects known from the good old days, the classic B&W panchromatic, B&W yellowfilter, bluetone and sepia, these filters enables you to rapidly create a desired effect.

When the profile or filter is set, adjust with white balance editor when you are satisfied with the tone of color, you can adjust exposure, contrast, brightness and saturation.

It is worth noticing that you find several presets in Exposure, the presets are mixes of settings adding different looks to your image.

If the image needs editing of highlight/shadow details the new High Dynamic Range Tool is perfect, first lift the shadowdetails, and then recover the highlight details until the desired result is reached.

When you are done editing just press process and the image will be processed to the default folder. If you press shift while pressing the Process button you will start process of all selected files.

New video tutorial on Capture One 4

After 3 weeks and tens of thousands of trials downloaded, Capture One 4 is already looking to be as successful as the previous versions.

Now we are offering more insight material to Capture One 4.

We have created a downloadable video tutorial for the application taking you through the workflow showing the way way to better images from activation of the application and to the processing of files.


The video tutorial is of 30 minutes duration and it is available in .wmv and .mov formats for download here
Valts Kleins has for more than 20 years been working as a broadsided photographer on the small Latvian market. By the eastern border of the Baltic Sea, the talented photographer is today amongst the very best


Valts tells us about working in the many various areas that opens on a small market, Packshots, portraits, fashion and much more – also the change to Phase One and Capture One.

Kim Kaiser amongst Pryor Mountain Wild Horses

Kim Kaiser is a many-sided nature photographer who takes authentic images and who takes the time to get the right shot. Read his colorful reportage from the Pryor Mountains, where wild horses live, love and fight.


As most quality minded photographers, Kim Kaiser is processing his images in Capture One and we’re proud to show our RAWNEWS-Readers images from the wild-wild west.

Capture One 4: Working with the pro’s

We recently invited 3 international photographers for a talk regarding the new Capture One 4. These professionals have all been testing Capture One 4 for some time and we asked them for feedback on how Capture One 4 can support their work.


To these photographers Capture One 4 is not just new packaging; Capture One 4 means improved speed, quality and tools, without compromising the basic intuitive workflow Capture One is known for.

The PRO version – where is it?

Capture One 4 is an update to Capture One 3.7.x. LE. Therefore PRO features are not yet available in Capture One 4.

The next generation of PRO software is based on the new application platform and design of Capture One 4 as well as the feature set of Capture One 3.7.x PRO. We are aware that many of you are waiting impatiently for features such as tethered shooting and other PRO features, however the foundation (i.e. application platform) has to be in place before we implement the PRO features.

We will of course keep you updated on the release schedule of PRO both in RAW NEWS and through our web site www.phaseone.com

In the meantime, take a look at Capture One 4 as it is today! The workflow, features, speed and out of the box image quality – it has all been improved.

We realize it takes time to get used to new ways of working, so here is a good chance to explore the new features, get to know the workflow and the improved user interface. Check out the workflow videos on the new application here: http://www.phaseone.com/4/

We are grateful for the feedback and encourage all of you to give your perspectives either through the user forum or as feedback directly through the application.

Capture One @ 4: The Icon Evolves

Featured photographer Nick Wilcox-Brown, England

Making changes to a popular application are never easy. There are always the few that will declare undying passion for the way things were and vociferously oppose any form of change.


Capture One version 4 represents a quantum leap forward for Phase One, both in terms of interface and processing technology.

Change is good and there is no question that the interface needed not only a freshen up, but to become truly cross platform like its younger competitors. As time passes, doubtless the new interface will grow on even the most hardened professionals.
We build software on the latest technologies and containing the features that are essential to obtaining superior image quality. On top of that, we take pride in offering a simple and logical user interface and an efficient workflow.

Having launched the beta version of Capture One 4, we now continue to chase bugs and improve features, such as extended camera support and optimized speed on all computers.

In addition to the broad input provided by photographers trying out the beta software, we are working together with an expert panel of photographers in the finalization of Capture One 4. This is of course a continuous work and it means that an improved release candidate will be released later this year and upon thorough testing we will launch the final version of Capture One 4.

We asked photographer Nick Wilcox-Brown to test Capture One 4 beta and share his impressions. You can see the result in the article below .
Featured photographer Vanessa Gavalya, owner of Vanessa Gavalya Photography, Texas, USA

It’s important for photographers to realize that we are in a service industry. We are artists, but if your goal is to make money as well, you have to provide great customer service and understand how to market yourself. Fantastic images have to be a given.


Personally, I photograph mostly people and love working with people. With my subjects, I try to show off what is lovable or alluring about that person... even if it’s a grumpy business man. Everyone has something attractive about themself… even if it’s not skin deep. Sometimes a picture is showing what’s on the inside and not just the outside.

The team that I put together is also a key component to a great shoot and a happy Client. I like working with people who are passionate about what they do and work hard. I think part of what has made me profitable quickly is that I work my tail off and think big…. for my business and for each Client.


To have success when I shoot, the Client needs to walk away happy. The Capture One software helps not only my workflow but also it makes things easier on the Client during the shoot. While I’m shooting the Client or art director can sit with the digital tech and flag hero shots and compare shots side by side. I shoot everything in RAW format. At the end of the day the hero shots can be converted to TIFF files or whatever format is needed, and the Client can leave with those shots in hand.

Award-winning Photography

Featured photographer Drew Gardner, London, UK.

Drew Gardner's Alice series has been nominated for The AOP Photographers’ Awards one of the highest accolades within the professional photographic industry.

As a fashion photographer, he has chosen to make magic out of a wardrobe by evoking a very specific mood through fanciful places. He calls it,Epic Fashion photography- an approach that takes fashion to a cinematographic level. The vision is compelling.


I was yearning for greater quality than any DSLR is capable of delivering. So I went out and bought a Phase One P 25 digital back. At the time I wondered what I had done; how could I have just spent so much money? But, in fact, I’d opened the door to a whole new era of my career, one that I could never have touched before; I had come upon opportunities that couldn’t have existed before. It was an epiphany.

A key difference is that the digital back captures in16-bit, whereas a DSLR typically captures in 12-bit. This is what gives you incredible color depth. It renders more natural looking colors, and because it’s giving you so much more data to work with, you get greater dynamic range - more latitude in adjusting exposure afterwards in RAW, without losing image quality. You also get incredible resolution and no noise.


Image Processing

In the early days of shooting digital, I thought I didn’t have to worry about exposures, that I could fix it all later. After spending three days clearing up themess from one shoot, I knew I had to make digital work for me or go back to film. I knew I had to get it right – so I went back to the basics. I started to shoot as if I were shooting on transparencies. Once I did that, I turned the corner. Also, up until then, I had tried all kinds of ways to process my RAW photo images. Then I found Phase One Capture One PRO. I found that it delivers great colors, low noise, and is very intuitive to use. You can sit down and learn it pretty easily - you don’t need a big book.

The features I rely on the most are the Color Editor, the Overlay Utility and Styles.

Back to the roots - with digital

By Featured Photographer Thomas Martin, owner of Thomas Martin Photography, Germany.


After looking back on a 10 year + history of using digital backs professionally I can truly say that I am as comfortable shooting digital as I was shooting film.

Having tried many digital systems, I use exclusively the Capture One PRO Software and the P 25 digital back from Phase One. The flow and ease of the software and its high quality of images really convinced me.


The combination of the digital back and the software gives me the ability to utilize my creativity in ways that were unthinkable when I started 20 years ago.

With the new generation of digital backs, P 25 or P 45 there is only one answer to this question: I work traditionally with digital!

The digital back combines the possibilities of analog photography with
the advantages of digital photography. When it comes to the ever lasting critical question of color & contrast then in my opinion there is an advantage in using a digital back.

With Phase One there is no limit in my creativity using light.


Read the full article.
środa, 27 sierpnia 2008

Love what you photograph

By professional photographer René Riis, Spektrum Studios, Denmark.

Success in Food & Drinks photography
I believe that you have to be passionate about what you photograph in order to be successful. You have to be able to be fascinated by and see the beauty in different kinds of food from an oyster to salami. Beside that of course, you have to master photographic techniques.

New image style
I use a cook and food stylist for larger assignments to get the right look. We have very few food stylists in Denmark. It is a limited market and the qualified stylists live abroad where the demand is bigger.

Food photography is a bit like fashion photography; the stylists are able to give the images the final touch that makes the difference. Clients and agencies often ask me to recommend a stylist. They each have individual styles, and that style has to match the assignment.

Equipment
I shoot with a Phase One P 20 digital back, using Capture One PRO. Besides that I use Adobe® Photoshop and once in a while I rent a Canon IDs MKII.

Capture One gives me a good overview, it quickly browses through images and I see it as an essential part of my equipment – it is my darkroom. It is crucial that all RAW files are converted to the best image quality. I get that with Capture One.

I use the feature called Styles a lot. It is really nice that you can see the style change immediately on all images. It is much easier to create a new look with the Styles function as inspiration.

Today digital development and improvements are moving unbelievably fast. Still, I cannot recall the last time I had problems with my equipment. It is essential for my work that my digital back is working 100% of the time, especially when I have clients in the studio!

________________________________


Capture One 3.7.6 includes a Live Preview feature.


Live Preview gives you instant feedback on your composition and any changes you make to this, when capturing images. With Live Preview you can speed up your work and capture the perfect images quickly, even if your camera is placed inaccessibly.

Live Preview currently supports Phase One's: P 45, P 30 and P 21 digital backs and will be an out-of-the-box feature with all the coming P+ digital backs.

With Capture One 3.7.6 we have also improved the support for Leica M8, Canon 400D/Rebel XTi; Nikon D80 and Sony α (alpha) DSLR-A100.

For specific improvements please refer to the release notes for Capture One.

Download Capture One 3.7.6 and release notes: http://www.phaseone.com/Content/Downloads.aspx